L2SPICE User Manual – v0.8¶
L2SPICE converts LibrePCB schematics into SPICE netlists for the JoSIM and JSIM SPICE simulators for superconducting electronics, writes edits back into the schematic (back-annotation), runs the simulators, and plots the results in an embedded viewer.
You work in two applications side by side: L2SPICE and LibrePCB. L2SPICE drives LibrePCB for you — it opens LibrePCB automatically on the relevant schematic whenever you create a circuit, open one, or load an example, and it detects when you save that schematic in LibrePCB. You draw and route in LibrePCB; you convert, simulate and back-annotate in L2SPICE.
L2SPICE has a windowed application (this manual) and a command-line interface for scripted and batch conversions; the CLI starts automatically whenever the executable is called with at least one argument. For a five-minute walkthrough see the Quick Guide; for a full worked example, First design with FrugalEDA.
Requirements
- The SuperLibre Superconductor library installed in LibrePCB — it provides the sources, devices and JoSIM/JSIM control commands L2SPICE knows how to convert. Installation is covered in the library description.
- Optional: the JoSIM and/or JSIM executables. The FrugalEDA installer bundles both; with a standalone L2SPICE, set their paths in Settings (§10).
Key terms
| Term | Meaning |
|---|---|
| L2SPICE project | Groups the netlists of one or several circuits, their shared subcircuits, and files derived from simulation. Lives in the L2SPICE workspace. |
| Circuit | One LibrePCB schematic paired with its SPICE netlist(s). A project can hold several. |
| Pairing | The link between a schematic and its netlist. Created by the first conversion; kept even when the two drift apart. |
| Synchronisation | Whether the paired schematic and netlist currently agree — shown as a coloured pill next to the netlist heading (§3.2). Independent of pairing: a circuit stays paired after you edit one side, it is just no longer synchronised until you convert or back-annotate. |
| LibrePCB workspace | Where LibrePCB stores its projects and libraries. L2SPICE reads schematics from here. |
| L2SPICE workspace | Where L2SPICE stores its own projects and simulation output. |
Part I — Using L2SPICE¶
1. The main window¶
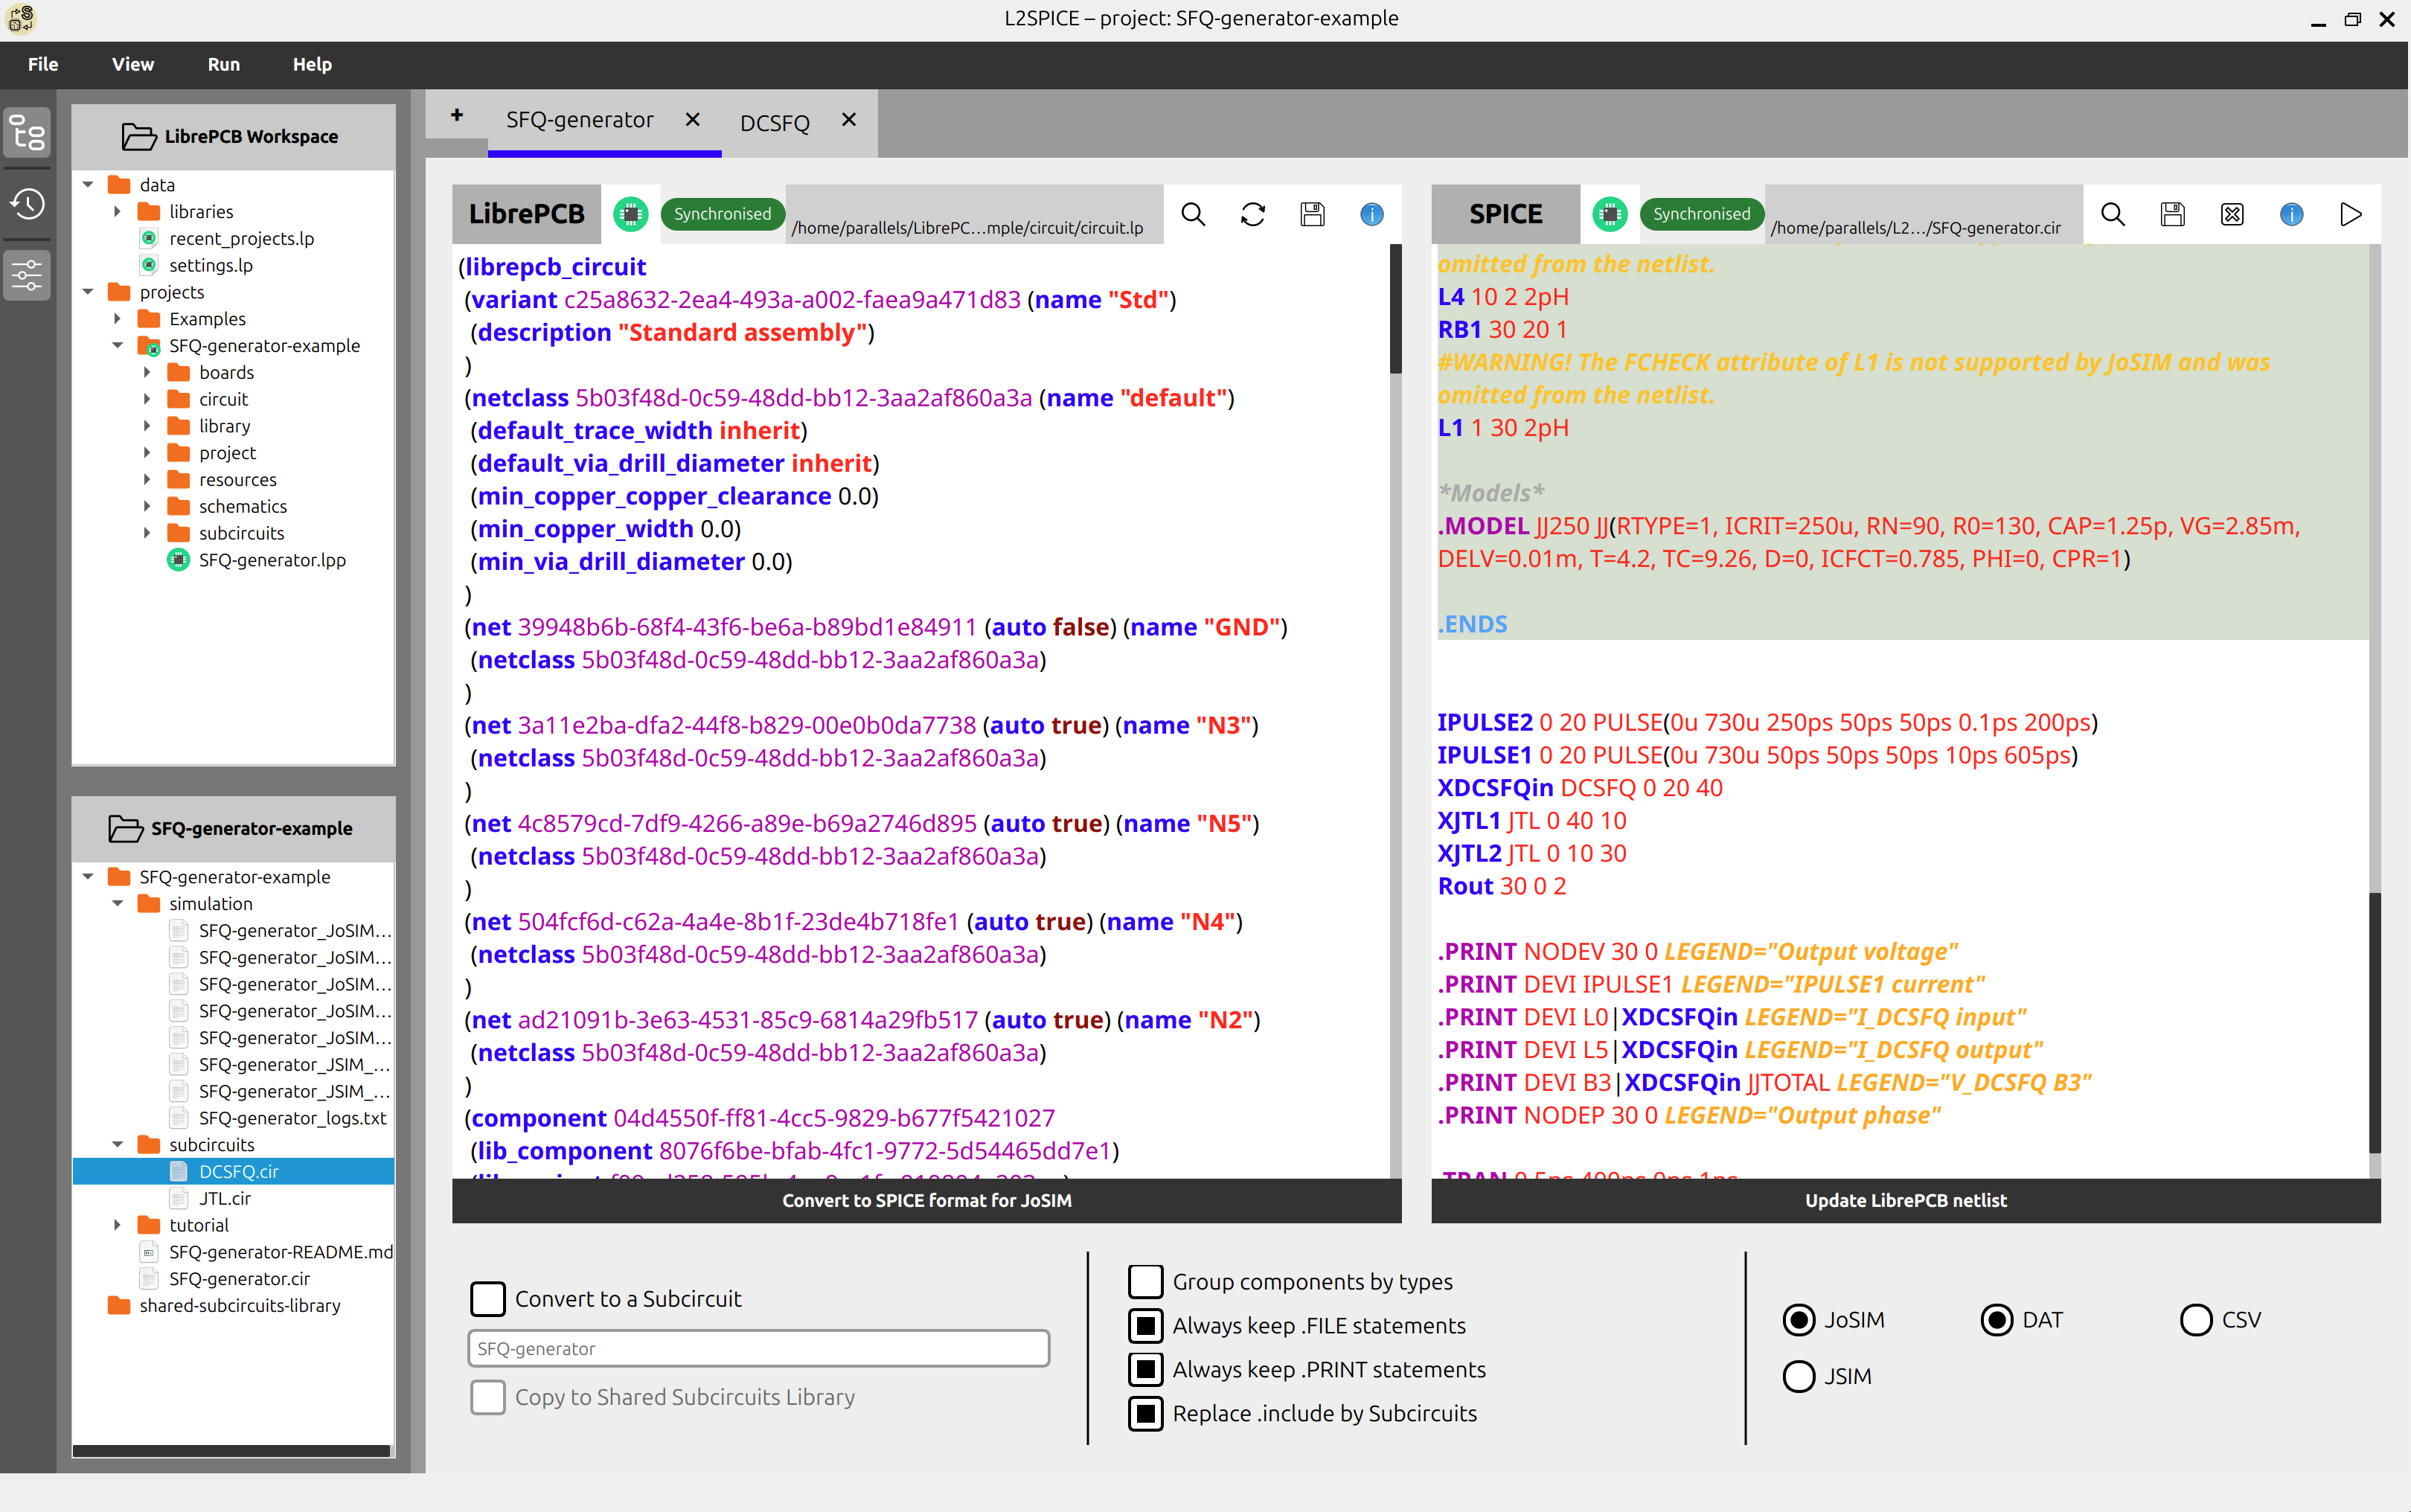
L2SPICE runs next to LibrePCB, which it opens automatically on the circuit's schematic. The L2SPICE window has, from top to bottom: the menu bar (§7), one tab per open circuit, the two editor panes, and — when shown — the conversion parameters panel along the bottom. Buttons down the left edge toggle the three side panels (§9); a status bar at the bottom shows the status tip of whatever menu item is under the pointer.
The editor panes are syntax-highlighted, searchable text editors: the LibrePCB schematic's netlist on the left, the SPICE netlist on the right. Each has a row of buttons in its heading and one full-width action button at the bottom — Convert to SPICE format on the left, Update LibrePCB netlist on the right. The buttons are listed in §8.
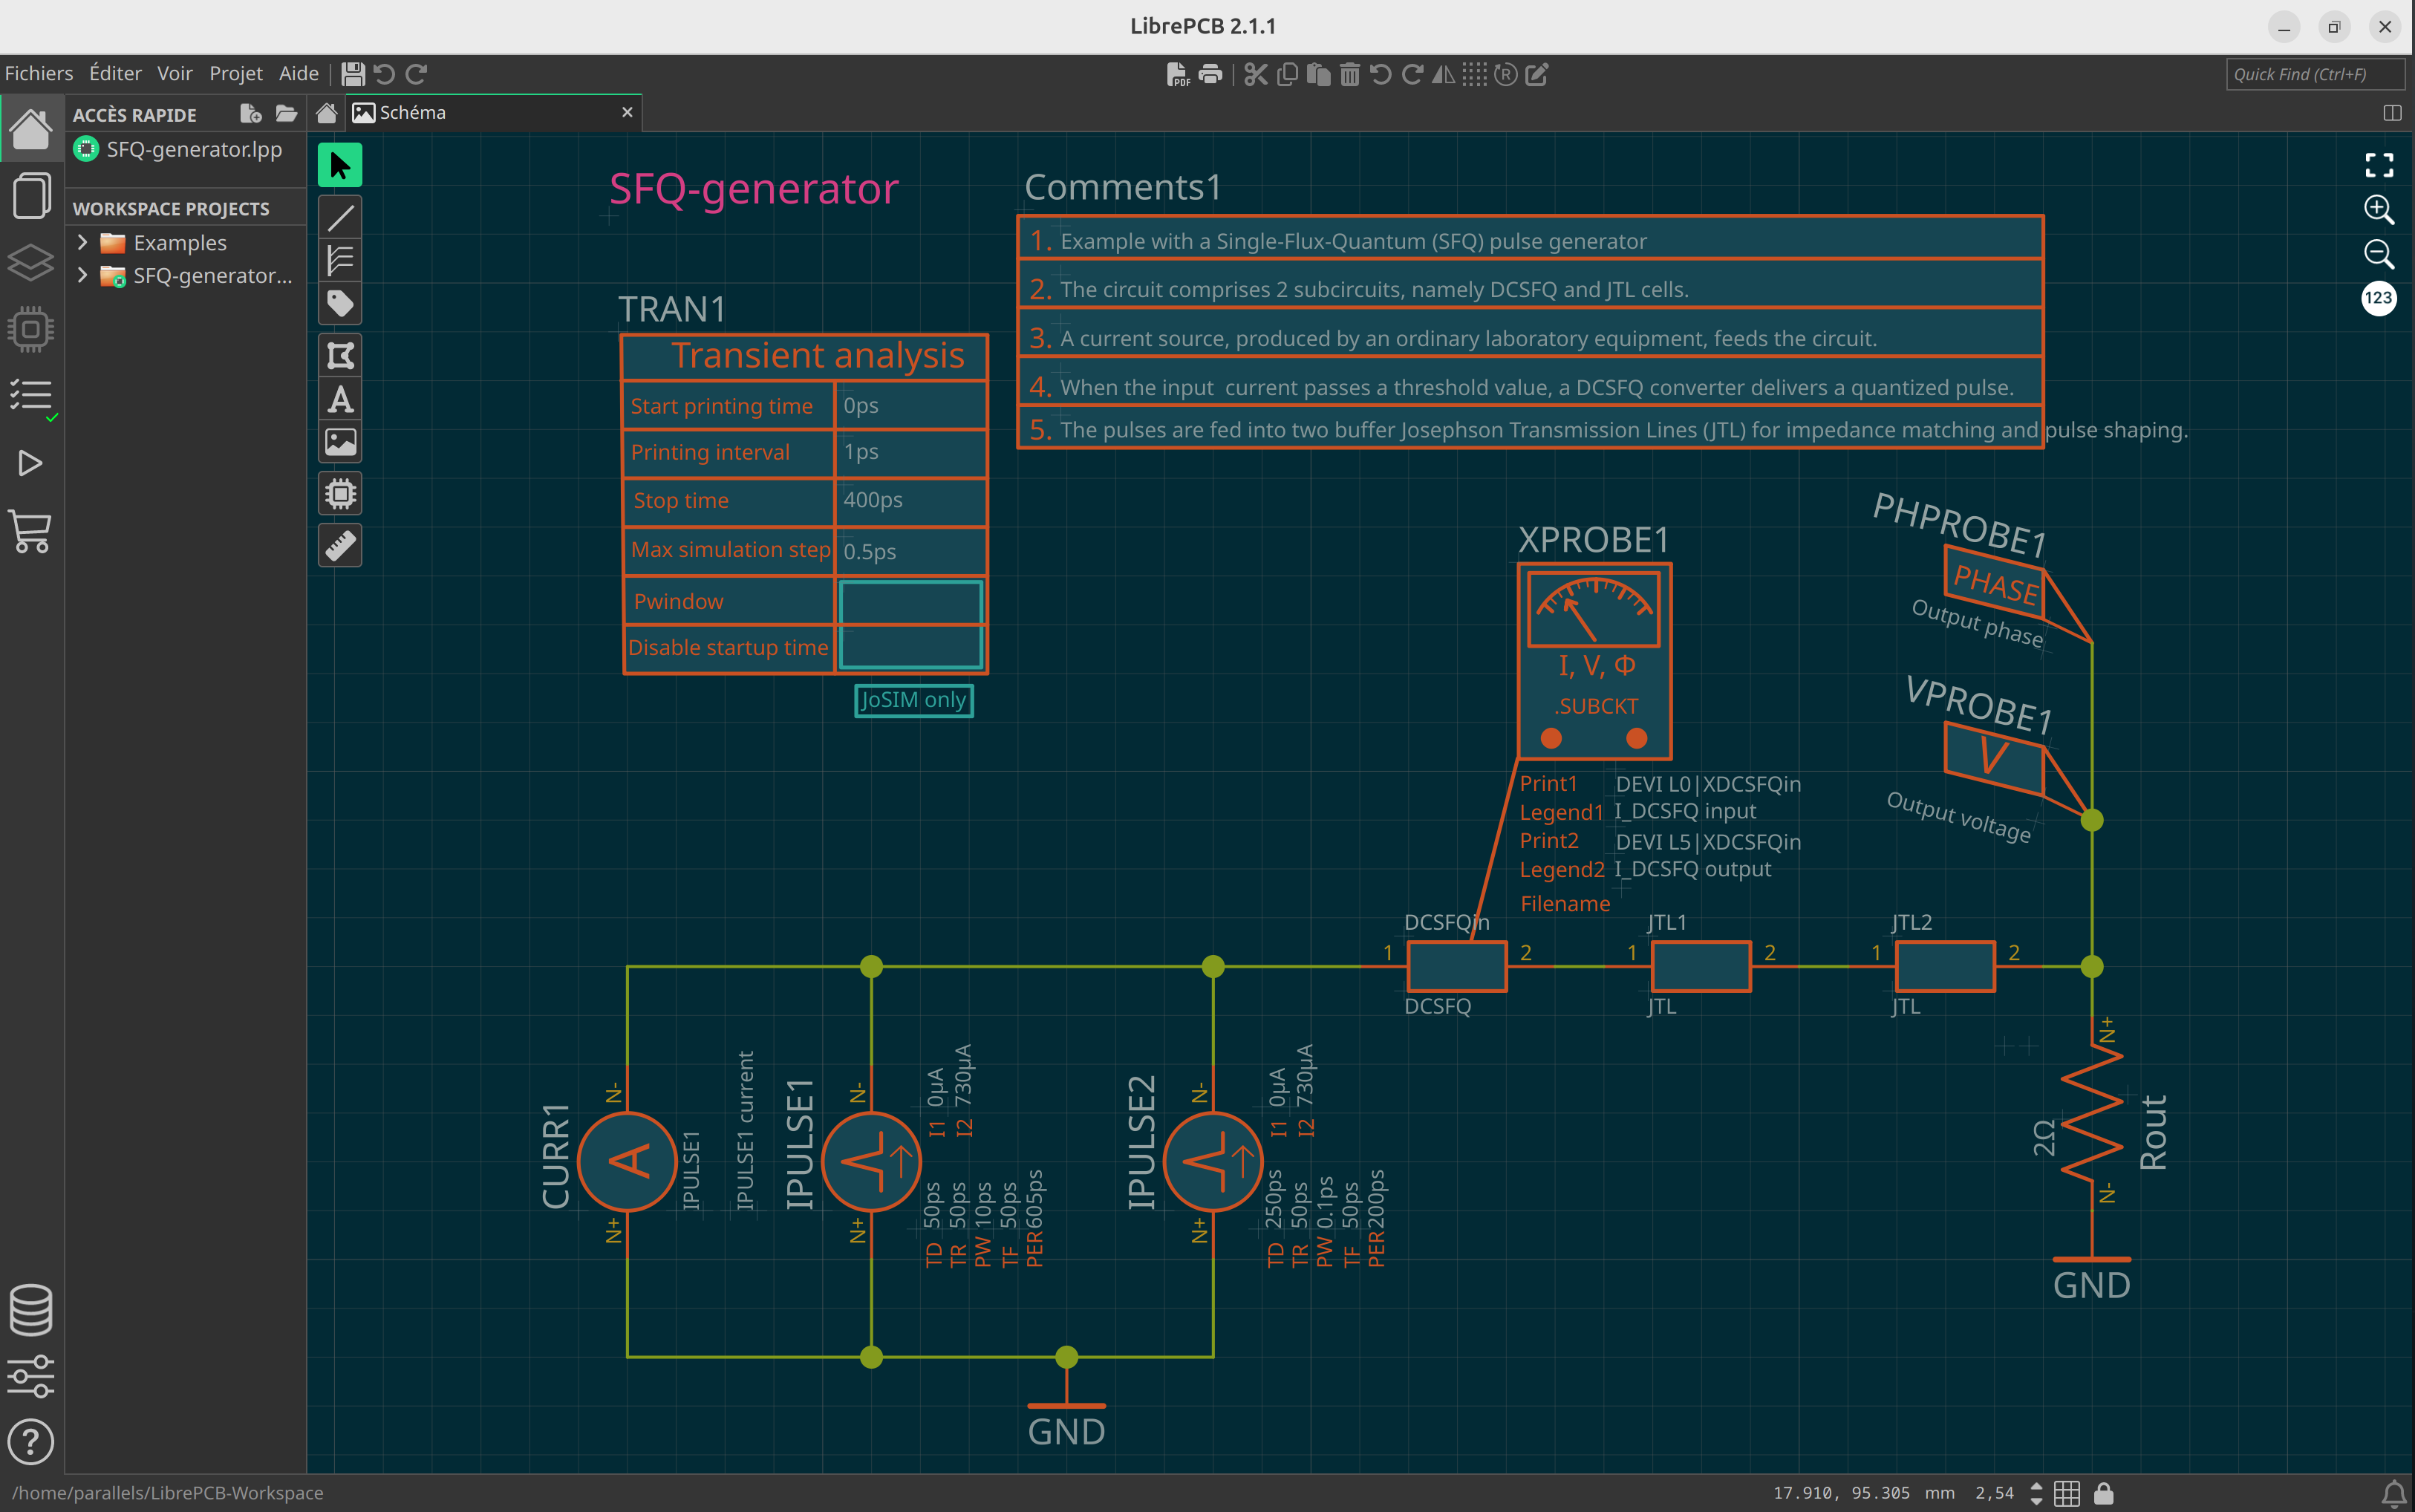
LibrePCB is the free, open-source EDA application where the circuit is actually drawn. It is a separate program, not part of L2SPICE — but L2SPICE launches it and keeps it pointed at the current circuit's schematic, so in practice the two are used together. In LibrePCB you place components from the SuperLibre library (Josephson junctions, current / voltage / phase sources, probes, transmission lines, subcircuits, and the JoSIM / JSIM control commands), wire them, set their attributes, and save. L2SPICE reads the saved schematic — its LibrePCB netlist, always the file circuit.lp — into the left pane and converts it.
L2SPICE never edits the schematic directly. The only path from L2SPICE back into LibrePCB is back-annotation (§4.2), which updates component values only. Anything structural — adding or removing a component, changing a connection or a source type — is done in LibrePCB, saved, then re-converted. Keep both windows visible: switch to LibrePCB to change the circuit, back to L2SPICE to convert, simulate and analyse. For LibrePCB itself, see the LibrePCB documentation.
2. Starting a project¶
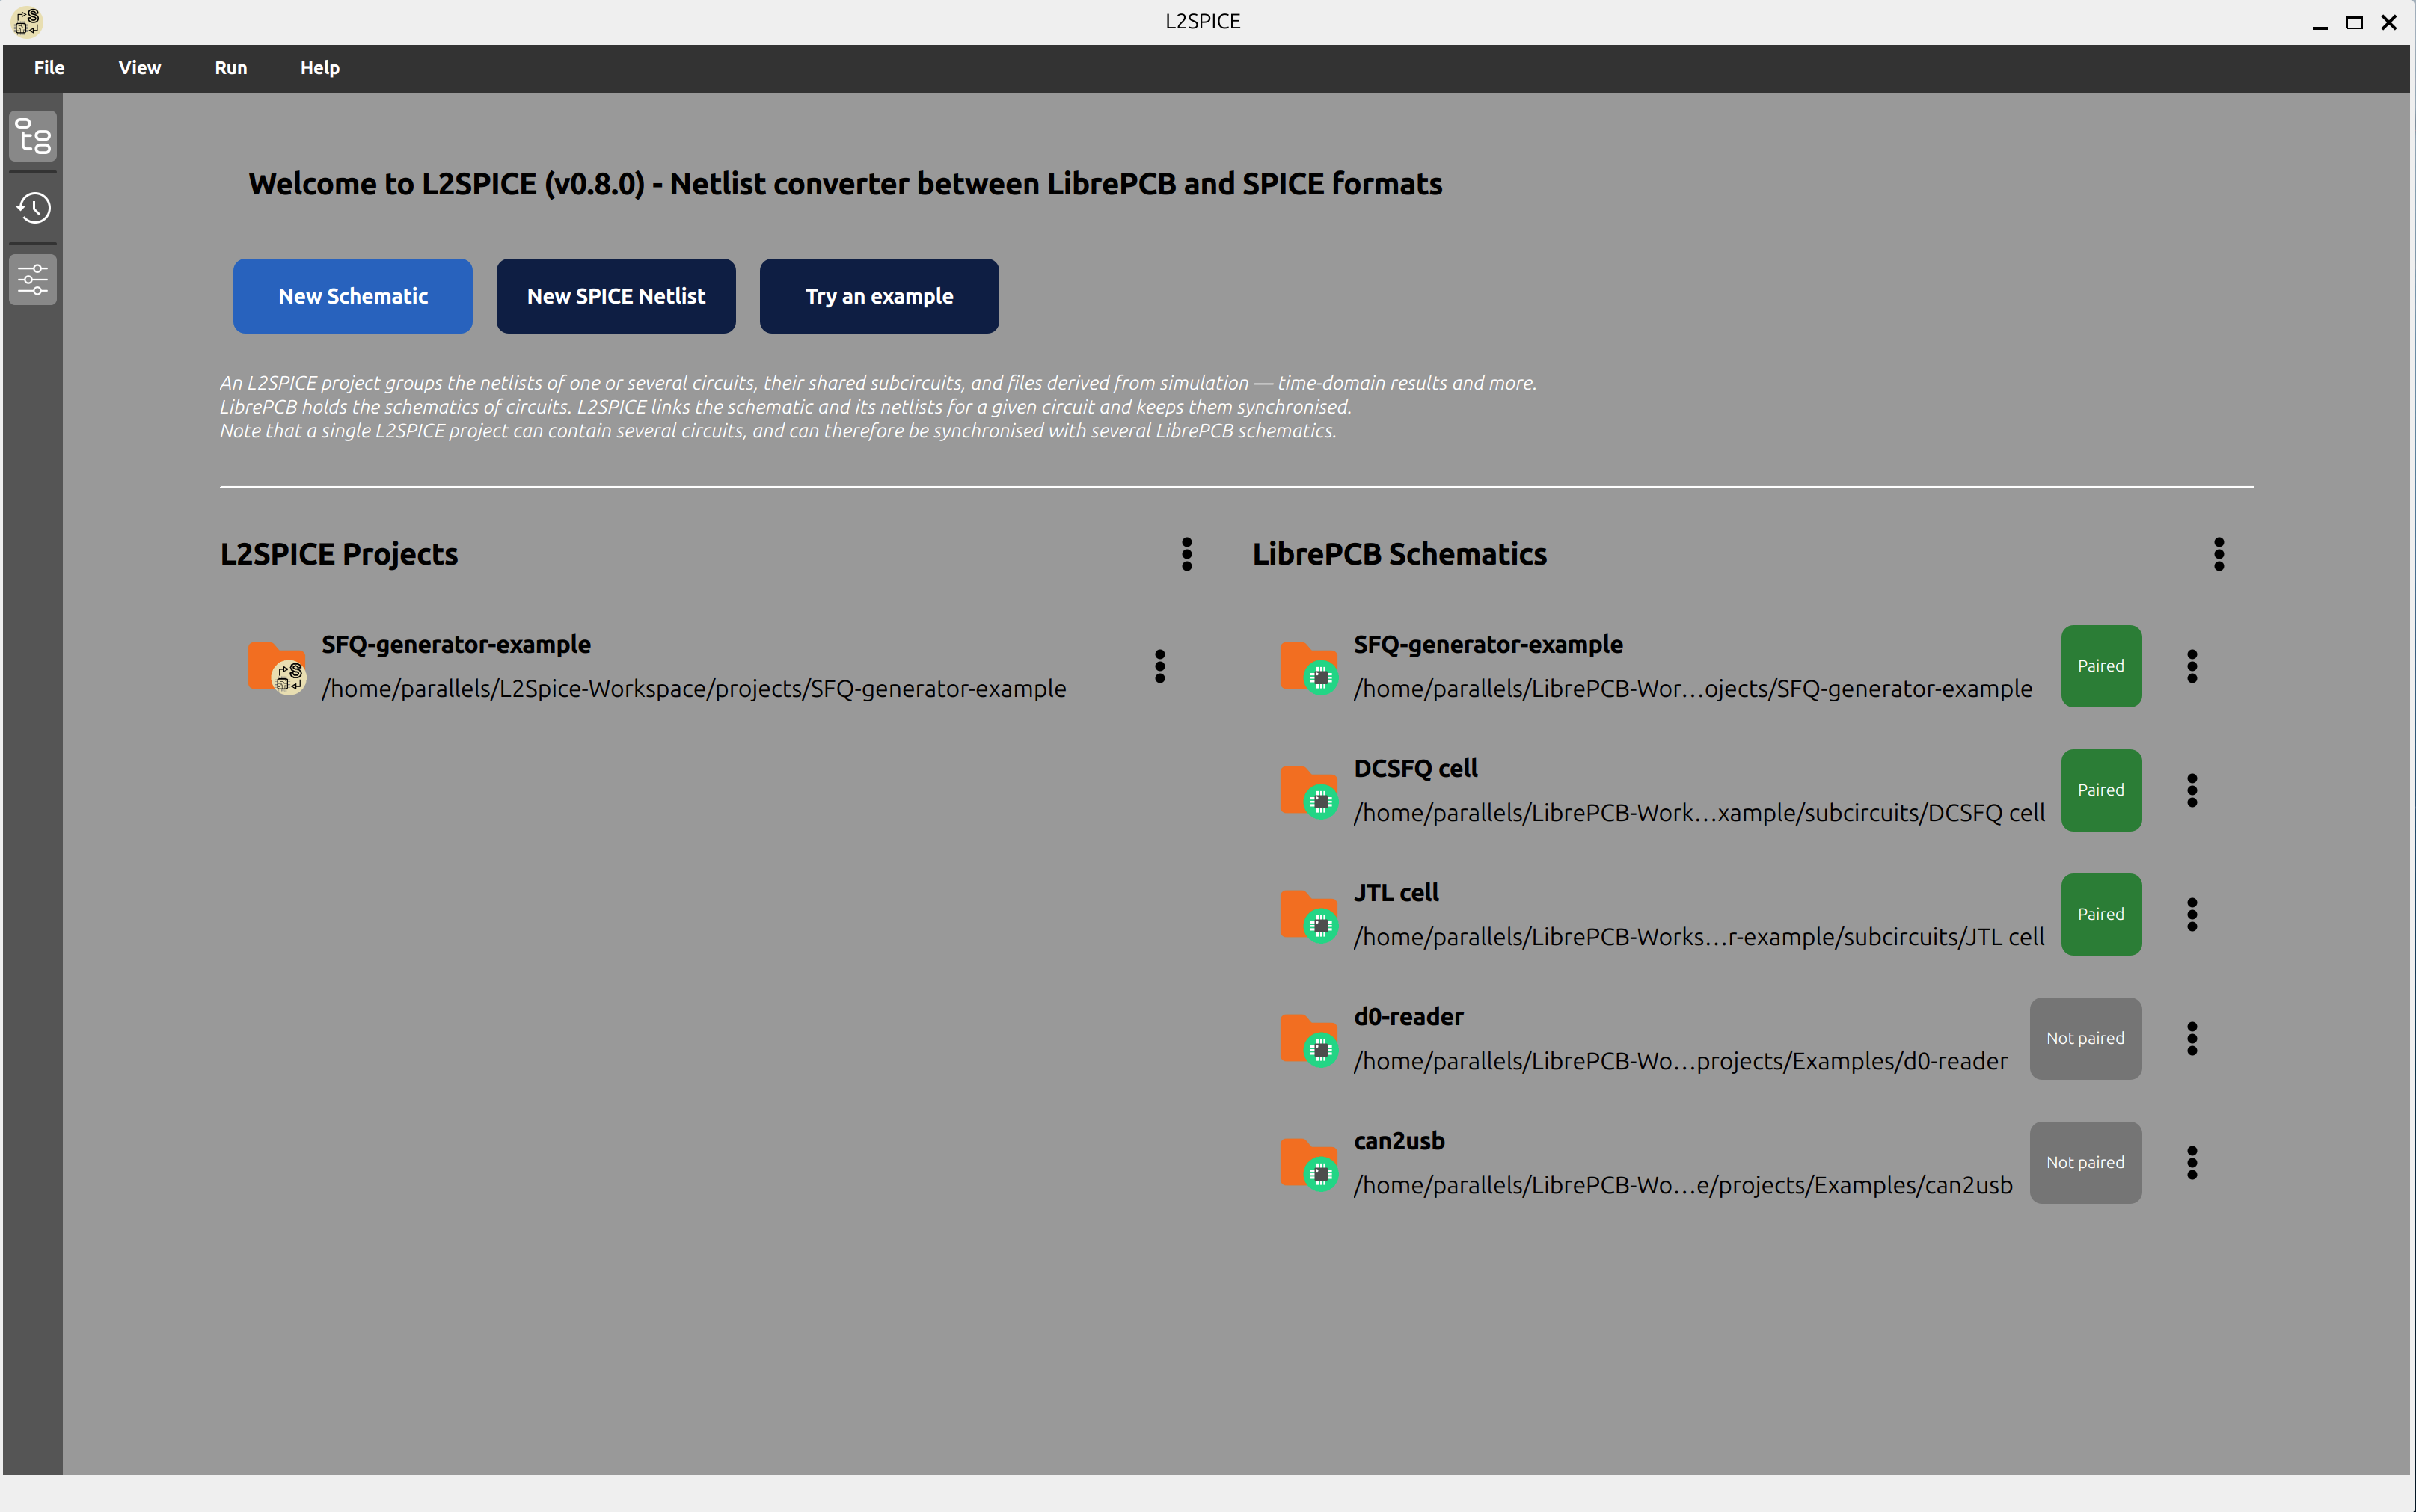
With no project open, the welcome screen offers:
- New Schematic — create a circuit and its LibrePCB schematic (in a new or existing project). L2SPICE opens the new schematic in LibrePCB automatically.
- New SPICE Netlist — create an empty netlist as a circuit, with no schematic.
- Try an example — copy a bundled example project into your workspace, convert it, and open it; LibrePCB opens on the example schematic.
The panel beside the buttons lists the projects and schematics already found in your workspaces; double-click one to open it — L2SPICE opens its schematic in LibrePCB at the same time.
You can also open an existing schematic or SPICE netlist stored elsewhere from the File menu — Open Schematic… or Open SPICE Netlist…. A file outside your workspace is copied into the project first. The full set of project and circuit commands is in §7.1.
3. Converting a schematic to SPICE¶
3.1. Choosing the simulator¶
Pick JoSIM or JSIM in Run ▸ Default Simulator or in the Conversion parameters panel (§9.3). Conversion is not identical for the two simulators, so choose before converting. For JoSIM you can also pick the result-file format, DAT or CSV; JSIM always writes DAT.
3.2. Converting and sync states¶
Click Convert to SPICE format below the LibrePCB pane. The SPICE netlist appears on the right, the pairing is recorded, and the pill next to the SPICE heading reports the state:
| Pill | Meaning | What to do |
|---|---|---|
| Not paired | Bare netlist, no schematic. | Converting a schematic is what creates a pairing. |
| Paired, never converted | Schematic and netlist linked but never verified to agree. | Convert to settle it. |
| Synchronised | Netlist matches the schematic it was built from. | Nothing — re-converting gives the same netlist. |
| Schematic changed | The schematic was edited since the last conversion. | Convert again. |
| Netlist changed | The SPICE netlist was edited since it was built. | Back-annotate, or discard the edits. |
| Built for X | Netlist was generated for the other simulator. | Re-convert for the selected simulator. |
| Both changed | Both sides edited since they last agreed. | Either direction loses one side's edits — choose deliberately. |
| Schematic not found / Netlist missing | A paired file is gone. | Restore the file, or convert to rebuild the netlist. |
L2SPICE watches the LibrePCB schematic files, so saving a schematic in LibrePCB flips the pill to Schematic changed on its own.
3.3. Automatic project conversion¶
The first time a project is opened, its main circuit and every subcircuit it instantiates are converted automatically — you do not convert them one by one.
3.4. Subcircuits¶
A circuit can be converted as a subcircuit (a .SUBCKT block) with the Convert to a Subcircuit option in the conversion parameters panel (§9.3). Subcircuits referenced by a circuit are pulled in automatically at conversion; for JoSIM they are .include by default, for JSIM they are always inlined. The Replace .include by Subcircuits option inlines them for JoSIM too, producing one self-contained netlist.
4. Editing and back-annotation¶
4.1. Editing the SPICE netlist¶
You can edit component values directly in the SPICE pane. The pill switches to Netlist changed to record that the netlist is now ahead of the schematic.
4.2. Back-annotation¶
Update LibrePCB netlist writes the SPICE pane's values back into the paired schematic. Only values are transferred — component names, the connections between them, and source types cannot be changed this way. Back-annotating a netlist built for a different simulator than the one selected is blocked, because it would corrupt the schematic.
4.3. Reloading and saving¶
- Update netlist from file (LibrePCB pane) reloads the schematic netlist from disk — use it after saving in LibrePCB.
- Save netlist / Save Circuit (
Ctrl+S) / Save L2SPICE Project write to disk at the file, circuit and project level. - Close and clear / Remove SPICE netlist clear a pane; the latter also deletes the netlist file.
4.4. Circuit notes¶
Show circuit notes opens the circuit's note — a Markdown document stored beside the netlist. The bundled examples ship one describing the circuit and what to try; the note travels with the circuit through Save Circuit As….
5. Running a simulation¶
5.1. Simulate¶
Run ▸ Simulate (F10), or the Simulate button on the SPICE pane, runs the selected simulator on the current netlist. The simulator executable must be set in Settings (§10).
5.2. Results¶
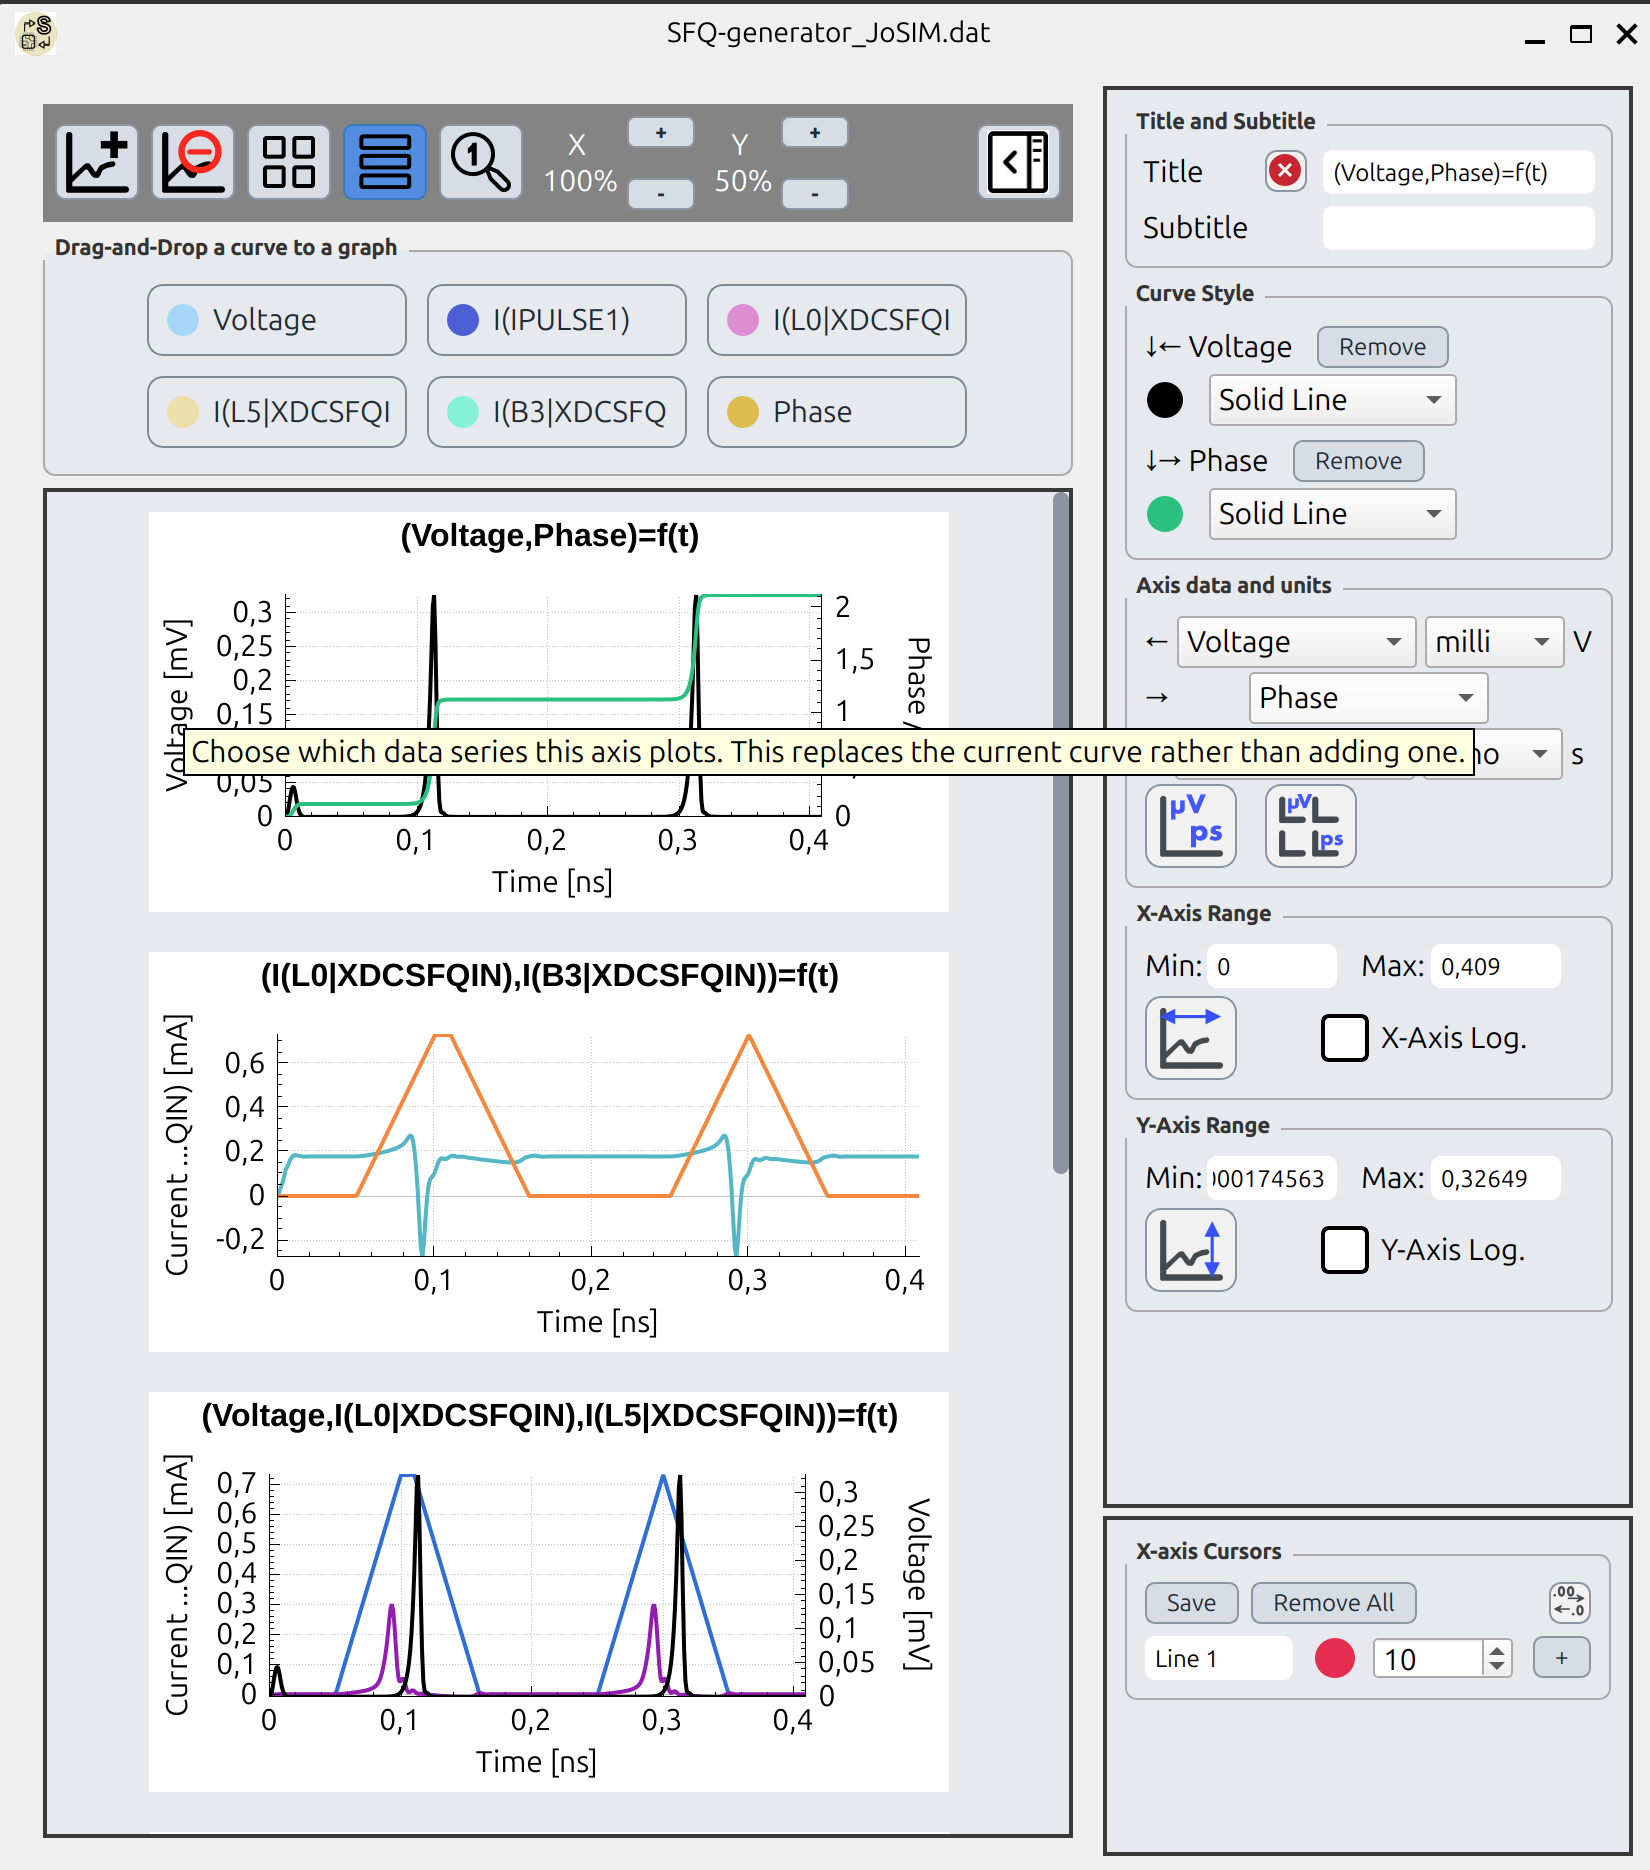
Results open in the embedded FrugalPlot viewer — one graph per output column, trackable curves, time cursors, selectable axis quantities, zoom and synchronised graphs. See the FrugalPlot manual.
5.3. Output files¶
Each run writes into a simulation/ folder in the project:
- the result file —
<circuit>_<simulator>_<time>.dat(or.csvfor JoSIM); - a log —
<circuit>_logs.txt.
6. History¶
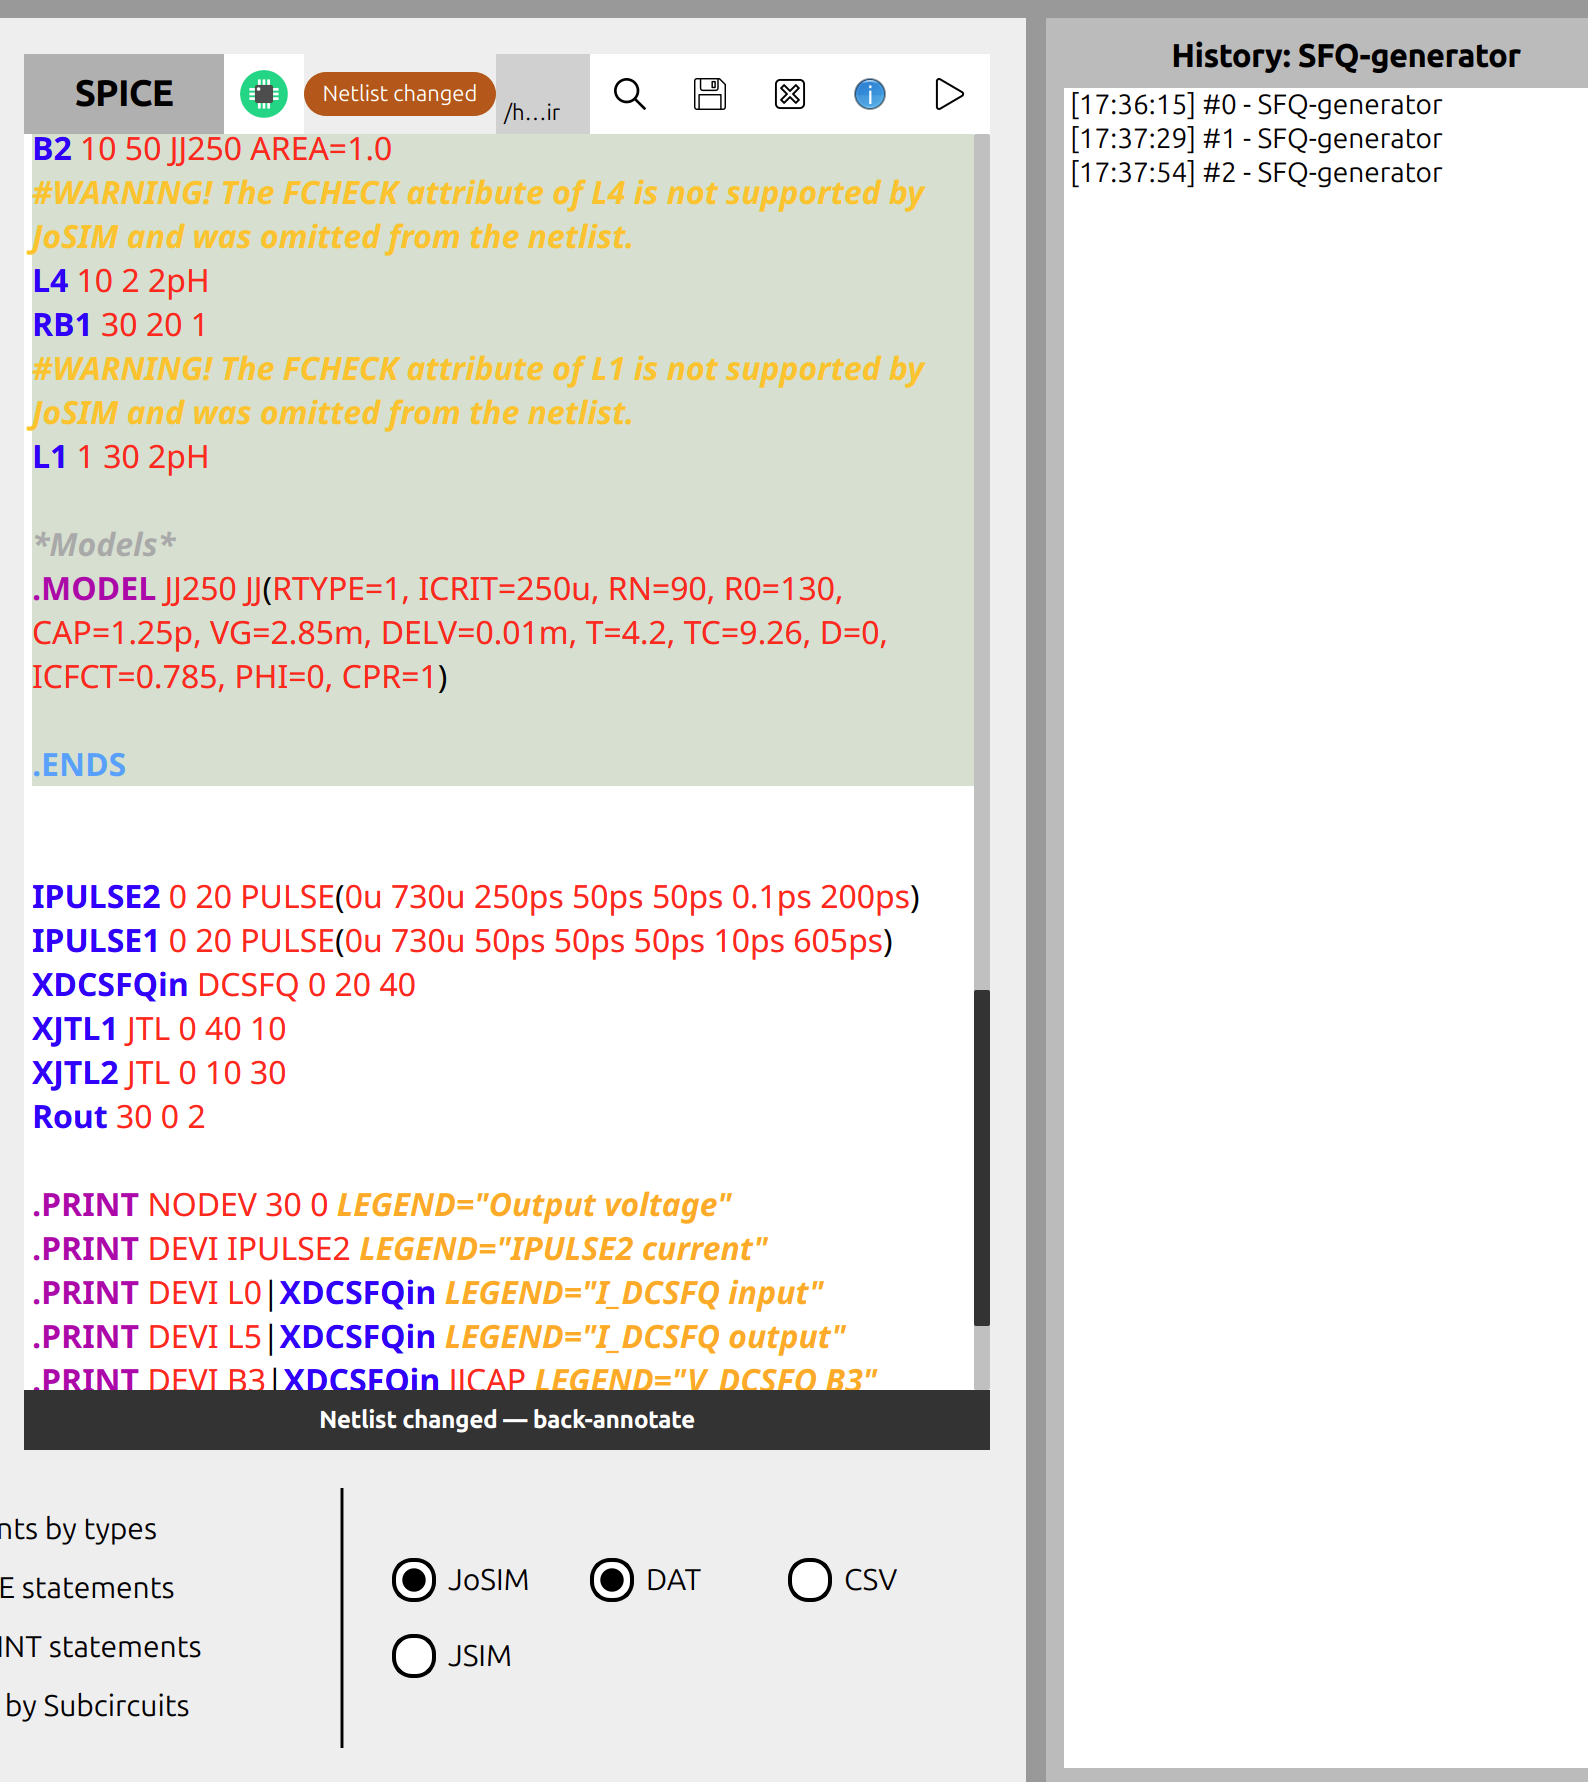
Every conversion and back-annotation of the current circuit is recorded in the History panel, each entry stamped with a time and an index. Click an entry — or use File ▸ Last / Previous / Next netlist (Ctrl+↓ / Ctrl+← / Ctrl+→, ⌘ on macOS) — to restore that state. Restoring over unsaved edits asks for confirmation first.
Part II — Reference¶
7. Menus¶
The menu bar holds File, View, Run and Help.
7.1. File menu¶
| Item | Shortcut | Action |
|---|---|---|
| New L2SPICE Project… | Ctrl+N |
Create an empty project. |
| Open L2SPICE Project… | Ctrl+O |
Open an existing project; if it holds several circuits you choose which to open. |
| Save L2SPICE Project | Save every circuit in the project. | |
| Close L2SPICE Project | Ctrl+F4 |
Close the project and return to the welcome screen. |
| New Schematic… | Ctrl+Shift+N |
New circuit + its LibrePCB schematic, opened in LibrePCB. |
| Open Schematic… | Ctrl+Shift+O |
Open a LibrePCB schematic as a circuit; one outside the LibrePCB workspace is copied in first. |
| Check Workspace Duplicate Identities… | Scan the LibrePCB workspace for project folders that were copied outside L2SPICE and so share an identity, and give each its own so all can be paired. | |
| New SPICE Netlist… | Ctrl+Alt+N |
New blank SPICE-netlist circuit, no schematic. |
| Open SPICE Netlist… | Ctrl+Alt+O |
Open a .cir file as a circuit; a file outside the project is copied in first. |
| Save Circuit | Ctrl+S |
Save this circuit's netlist and, if present, its schematic. |
| Save Circuit As… | Fork an independent copy of the circuit — SPICE side plus its LibrePCB project — under a new name (no folder picker; the copies are placed in the current project and the LibrePCB workspace automatically). | |
| Close Circuit | Close the current circuit tab. | |
| Last / Previous / Next netlist | Ctrl+↓ / Ctrl+← / Ctrl+→ (⌘ on macOS) |
Step through the circuit's conversion history (§6). |
| Settings | F8 |
Open the Settings dialog (§10). |
7.2. View menu¶
Show workspace overviews panel, Show history panel, Show conversion parameters panel — the same toggles as the buttons on the left edge of the window (§9).
7.3. Run menu¶
Simulate (F10) and Default Simulator ▸ JoSIM / JSIM.
7.4. Help menu¶
L2SPICE Documentation, LibrePCB Documentation, Try an example, About L2Spice, About Qt.
8. Editor panes¶
Both panes are syntax-highlighted text editors with an in-editor search — the Search button opens a bar with Find Next / Find Previous.
8.1. LibrePCB pane (left)¶
| Button | Action |
|---|---|
| Open in LibrePCB | Bring the paired schematic to the front in LibrePCB (launching it if needed). |
| Update netlist from file | Reload the schematic's netlist from disk — use it after saving changes in LibrePCB. |
| Save netlist | Write the pane's text back to the linked file. |
| Close and clear | Clear the pane and drop the link to the file. |
| Show circuit notes | Open the circuit's note (§4.4). |
| Convert to SPICE format (full-width, bottom) | Build the SPICE netlist. Its wording changes with the sync state (§3.2). |
8.2. SPICE pane (right)¶
| Button | Action |
|---|---|
| Open in LibrePCB | Bring the paired schematic to the front in LibrePCB. |
| Save netlist | Write the SPICE netlist to its file. |
| Remove SPICE netlist | Clear the pane and delete the linked netlist file. |
| Show circuit notes | Same note as the left pane. |
| Simulate | Run the selected simulator on this netlist (§5). |
| Update LibrePCB netlist (full-width, bottom) | Back-annotate: write this netlist's values into the schematic (§4.2). |
9. Side panels¶
Toggle from the View menu or the buttons on the left edge of the window.
9.1. Workspace overviews¶
Two file trees — LibrePCB Workspace and L2Spice Workspace — of projects, schematics, netlists, subcircuits and simulation results. Double-click a file to open it in the current tab; right-click for:
- Open in current tab / Open in new tab
- Open With FrugalPlot — open a
.dat/.csvresult directly in the plot viewer - Rename, Duplicate / Duplicate Schematic, Delete
9.2. History¶
Every conversion and back-annotation of the current circuit, newest last, each stamped with a time and an index. Click an entry to restore that state — see §6.
9.3. Conversion parameters¶

Options applied by the next conversion.
| Section | Option | Effect |
|---|---|---|
| Subcircuit | Convert to a Subcircuit | Convert this circuit as a .SUBCKT block. Enables the name field and Copy to Shared Subcircuits Library. |
| Subcircuit name | Name of the block (letters, digits, _, -). Empty ⇒ unnamed. |
|
| Copy to Shared Subcircuits Library | Also save the subcircuit to the shared library folder (§10) instead of only the project. | |
| Output | Group components by types | Emit components grouped by category and sorted alphabetically instead of following the circuit's connectivity. |
| Always keep .FILE statements | On (default): keep the .FILE output redirections. Off: strip them all. The .FILE output redirection is helpful to store data in an organized way when JoSIM or JSIM are used standalone. L2SPICE has its own file management system. |
|
| Always keep .PRINT statements | On (default): keep .PRINT lines for meters that write to no file. Off: drop them. Curves still appear in FrugalPlot because JoSIM, given a netlist with no .print / .plot / .save, writes every node voltage and phase by default — the whole circuit is plotted. JSIM does not: it needs explicit .PRINT lines, so turning this off leaves a JSIM simulation with no output. |
|
| Replace .include by Subcircuits | Inline referenced subcircuits (JoSIM). | |
| Simulator | JoSIM / JSIM + DAT / CSV | Target simulator and, for JoSIM, the result-file format. |
10. Settings¶
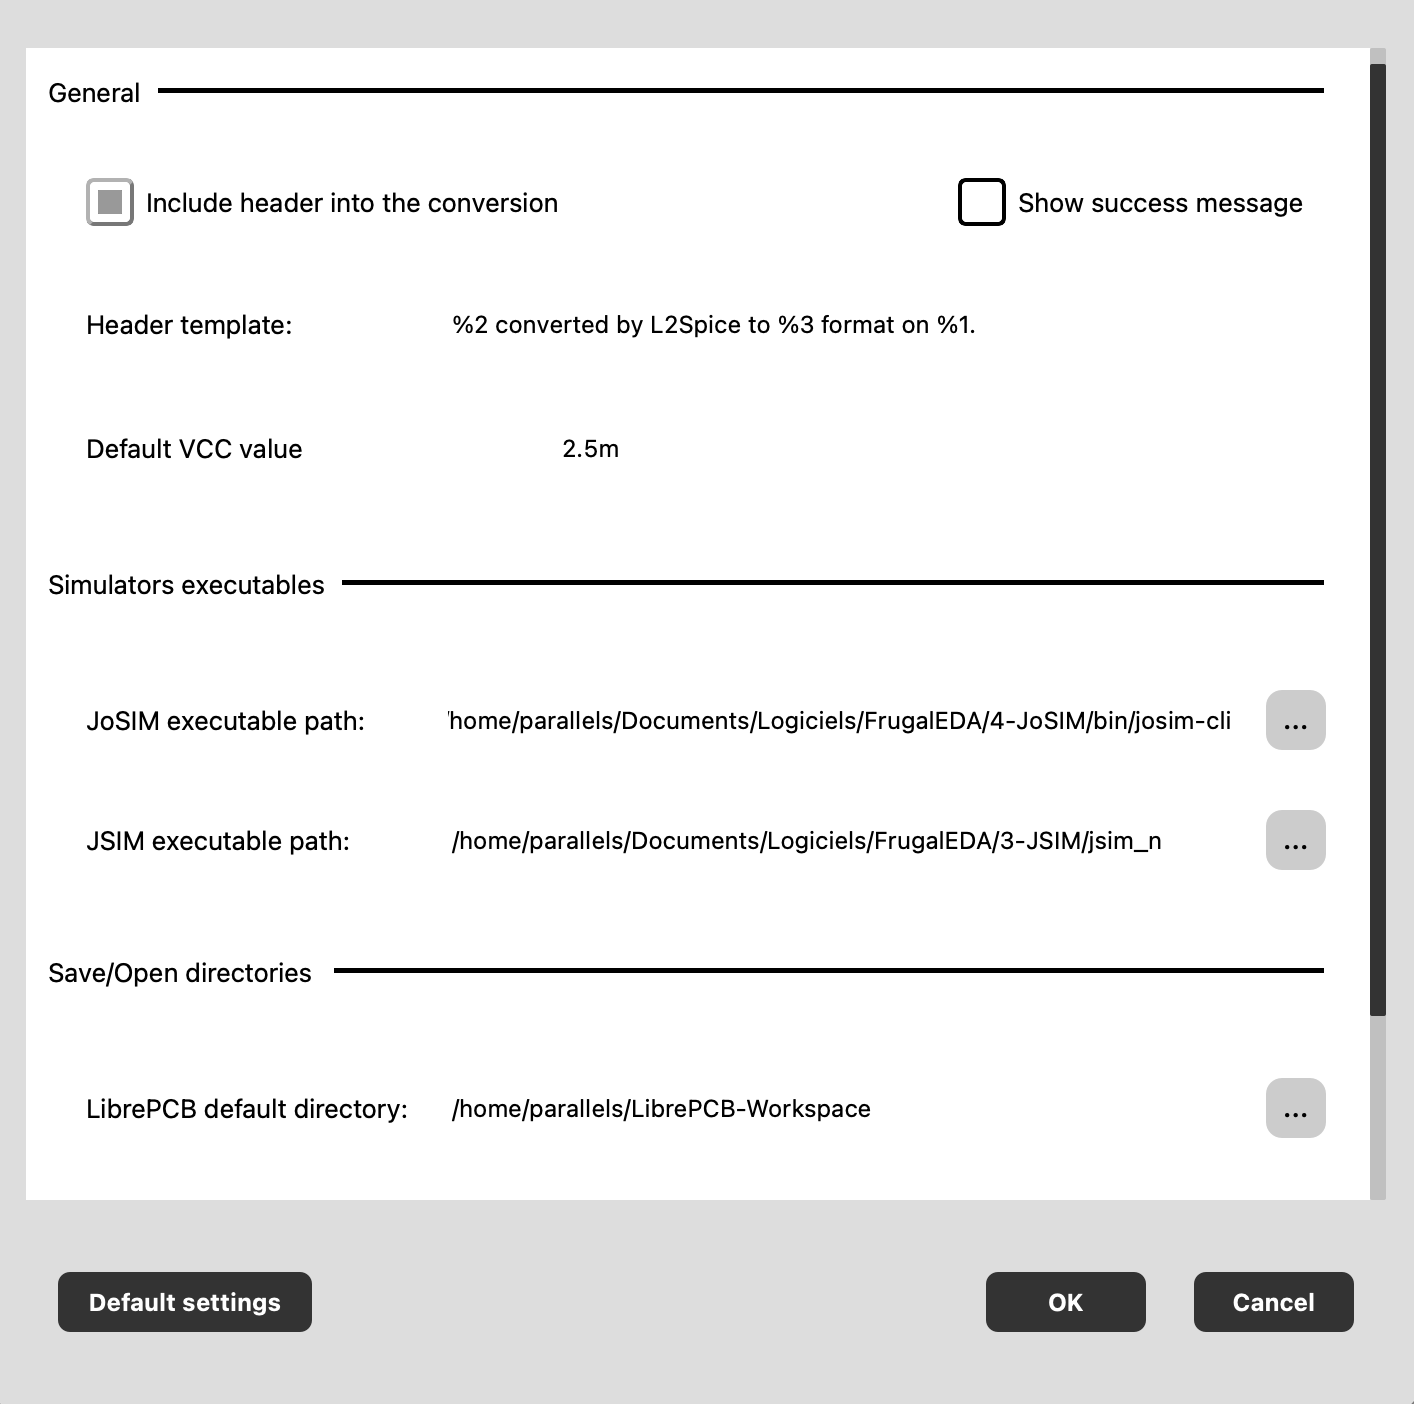
Open with File ▸ Settings or F8.
| Group | Field | Purpose |
|---|---|---|
| General | Include header into the conversion | Prepend a comment header to converted netlists. |
| Show successful simulation message | Show a confirmation dialog after a simulation completes. | |
| Header template | The header text. Placeholders: %1 conversion time, %2 project name, %3 simulator. Default: %2 converted by L2Spice to %3 format on %1. |
|
| Default VCC value | VCC used in generated netlists (default 2.5m). Accepts SI suffixes (p, n, u, m, k, x, meg). |
|
| Simulators executables | JoSIM executable path / JSIM executable path | Full path to each simulator binary, used by Simulate and the CLI -r. |
| Save/Open directories | LibrePCB default directory | Where the LibrePCB file dialogs open. |
| Spice default directory | Where the SPICE file dialogs open. | |
| Shared subcircuits library | Folder for subcircuits saved with Copy to Shared Subcircuits Library. |
Default settings restores every field to its factory value.
11. Command-line interface¶
L2SPICE runs headless from the command line for scripted and batch conversions, one-off setting overrides, and running the simulator in CI. See the CLI reference.
FrugalEDA is open source software. For the latest updates and source code, visit our repository.